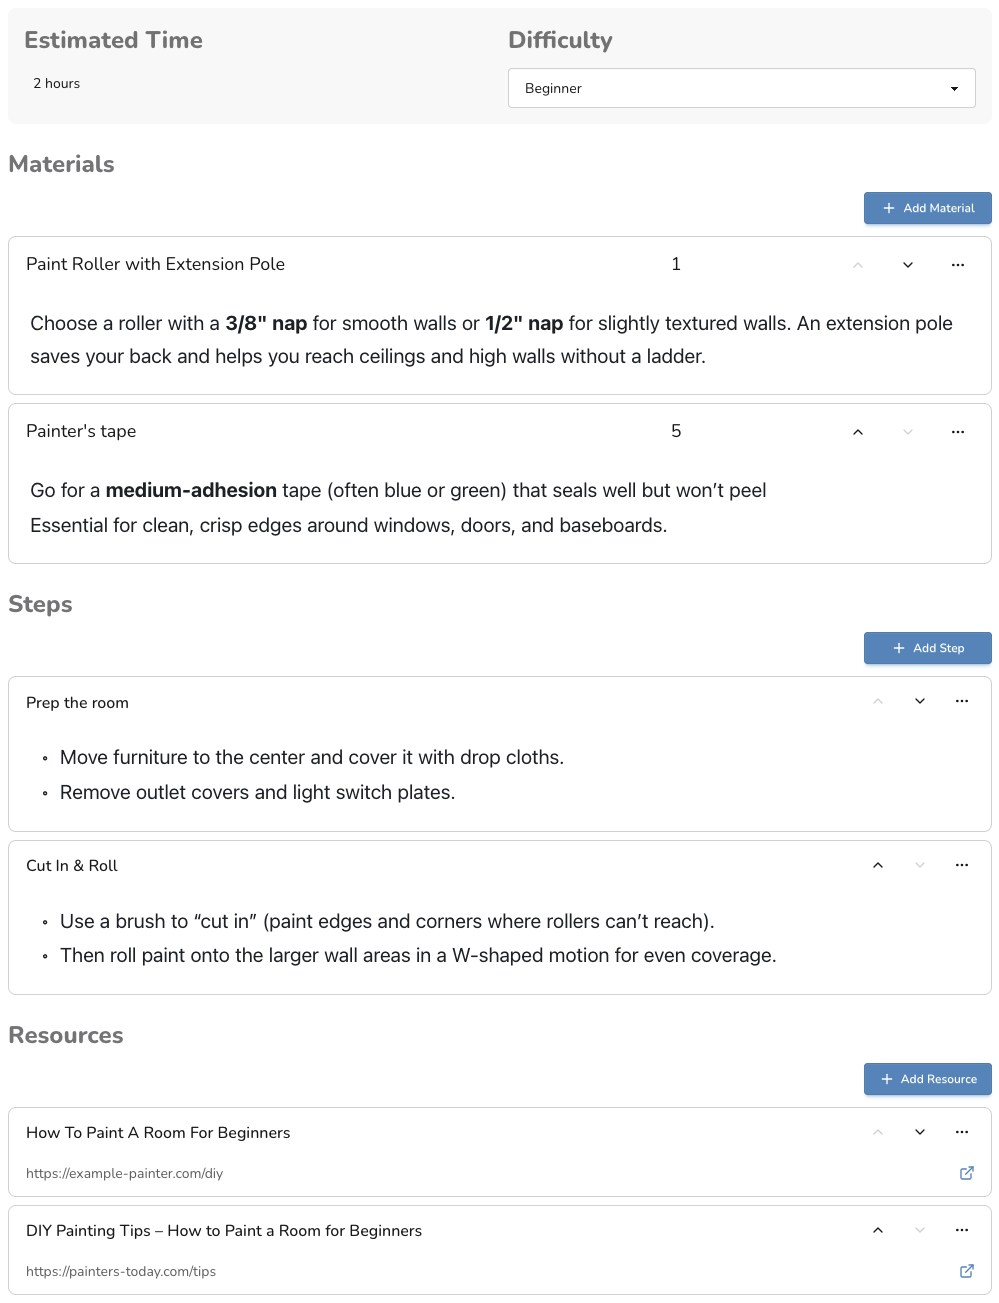
DIY View for Public Checklist Templates
The DIY view is designed for maker projects, builds, repairs, and how‑tos that benefit from a structured three-section format:
- Materials - List all required items, tools, and supplies with quantities
- Steps - Provide clear, sequential instructions for completing the project
- Additional Resources - Include helpful links to guides, tutorials, or reference materials
Use DIY when your content naturally breaks down into this Materials → Steps → Resources structure. If your content doesn't fit this format, use the flexible Checklist View.
New to templates? Start with Create from Scratch or Generate from Content, then refine in the Template Editor.

Examples of successful checklists
Get inspired by these popular templates that demonstrate different content types and approaches:
- Paint a Room Checklist - DIY home improvement with materials and step-by-step process
- Moving Checklist - Comprehensive life event planning with timeline organization
- Pedicure Checklist - Personal care routine with detailed self-care steps
- Event Checklist - Event planning template covering all essential aspects
These examples show how checklists work across different niches—from home improvement and life events to personal care and event planning. Notice how each provides genuine value that users can immediately apply.
Structure at a glance
- Materials: List what’s needed to complete the project
- Steps: The procedure to follow, in order
- Resources: Helpful references or tools for further reading
Editor features such as cover image, tags, SEO, and publish are managed in the Template Editor.
Materials section
Each material item includes structured fields:
- Item: The material or tool name
- Qty: Quantity
- Notes (optional): Details, tips on how to choose
Behavior and tips:
- Quick entry: Type Item and Qty; press Enter to add the next material
- Reorder: Use move up/down buttons
- Add Material button to add below selected material (or last if none selected)
Steps section
Each step item includes:
- Name: Short imperative description of the action
- Notes (optional): Clarifications, tips, etc.
- URL (optional): Reference link
Working with steps:
- Create below: Press Enter to add the next step
- Reorder: Move up/down within the list
- Notes: Use notes for details; keep names short
- Add Step button to add below selected step (or last if none selected)
Resources section
Use this section to reference additional reading, examples etc. Each resource item includes:
- Name: What the resource is
- URL: Link to the resource
- Notes (optional): Why it’s helpful or when to use it
Tips:
- Include only high‑value resources
- Prefer official docs, product pages, or authoritative guides
Notes and visibility
- Show task notes: Toggle in the sidebar to reveal note fields across sections while editing
- Per‑item notes: Expand an individual item to add or edit its notes
Best practices
- One action per step: Keep step names short; add details in notes
- Order matters: Arrange steps in the exact sequence users should follow
- Keep it scannable: Use concise wording; avoid long paragraphs in names
- Add a relevant cover image and tags before publishing (see Template Editor)
Common patterns
- Materials → Setup steps → Main steps → Verification → Cleanup
- Include safety notes or disclaimers in the template description when relevant
- Use Resources for product manuals, datasheets, and in‑depth guides
